Speller Keyboard User Manual
In the Box
- Speller Keyboard
- USB Type C cable (for wired usage and charging)
- USB Type C to A adapter (for connecting to host devices without a USB C port)
- Spare Blank Keycaps (x4)
Hand Strap
The strap is velcro so you can adjust it to fit your hand comfortably. It can also rotate around to different angles, and has a kickstand which you can use to prop up the keyboard.
Two keys to know
On the right edge of the keyboard, at the top:
- The logo key (top-right, with the Cyboard logo) shows and hides the keyboard's status lights. It pulses amber while they're on.
- The Bluetooth key (right below it) is the pairing key. Tap it to switch typing between USB and Bluetooth; hold it for 3 seconds to pair.
Connect Your Speller
- Wireless (Bluetooth)
- Wired
Just plug the USB cable into your Speller Keyboard and the device you want to use it with (computer, iPad, phone, etc.).
You don't need to turn the power switch on. While it's plugged in, it works like a regular wired keyboard.
These instructions are for firmware v1.2.0 or newer, which made pairing much simpler. If your Speller shipped earlier, either update the firmware first (recommended — it only takes a couple of minutes), or follow the older pairing instructions.
Pairing
Pairing is the same two steps every time, whether it's a brand-new keyboard or one you've used for years. (First, make sure the keyboard is on: slide the power switch at the top toward the USB port until it clicks.)
Prefer to watch? This short video shows the two pairing steps — or read on below for the written version.
- Press and hold the Bluetooth key for 3 seconds. Its light brightens blue as you hold, then starts pulsing — the keyboard is ready to be found (for 3 minutes).
- On your device (iPad, phone, or computer), open Bluetooth Settings, find Speller, and tap Connect. That's it — no codes to type, no slots or profiles to keep track of.
From now on, the Speller and that device find each other automatically every time you switch the keyboard on.
Moving to a different device
The Speller types on one device at a time. To move it, just pair with the device you're moving to — the same two steps as above. The keyboard lets go of the old device by itself.
One bit of housekeeping: the device you left still shows a Speller entry in its Bluetooth list. Remove it (Forget This Device) — you'll need that gone anyway if you ever switch back, and a leftover entry is the usual cause of "can't connect".
If your Speller is plugged into a computer (for example to charge), it can type over the cable instead. Tap the Bluetooth key (a quick tap, not a hold) to switch typing between the cable and Bluetooth.
The Speller Keyboard requires Bluetooth 4.2 or newer on your host device. On iPads, this means 5th generation (2017) or later.
Status Lights
A few lights work all the time:
- The Bluetooth key pulses blue whenever the keyboard is in pairing mode (and brightens while you hold it during the 3-second pairing hold).
- The Caps Lock key pulses while Caps Lock is on.
- While the # (numbers) layer is on, the # key pulses and the A–J keys light up to show they're typing 1–0.
For everything else, press the logo key to show the full status display; press it again to turn it off. While it's on:
One color per connection — blue means Bluetooth, white means USB — and brightness tells you where typing goes: the key that's lit bright is the connection your typing uses right now.
| Key light | What it tells you |
|---|---|
| Logo | Pulses amber to remind you the status display is on |
| Bluetooth key | Bright blue = typing over Bluetooth · dim blue = connected, but typing over USB right now · pulsing blue = in pairing mode · off = not connected |
| C and D (the two keys beside the USB port) | Bright white = typing over the cable · dim white = plugged in, but typing over Bluetooth right now · orange = charging only (power adapter, or no data cable) · off = unplugged |
| K L M N | Battery: 4 green lights = full, down to 1 light = 25% or less. The last light turns yellow when the battery is low and red when it's nearly empty — time to plug in. |
Default Layout
This is what the keys do on your Speller Keyboard by default:
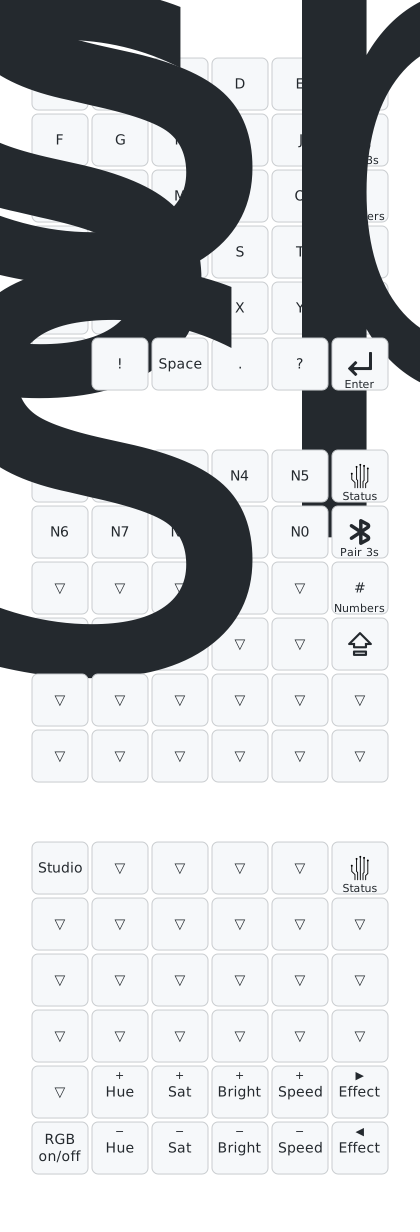
The special keys on the right edge, top to bottom:
- Logo — show/hide the status lights (pulses amber while they're on)
- Bluetooth key — tap: switch typing between USB and Bluetooth · hold 3 s: pair
- # — toggle the numbers layer (A–J type 1–0; the lit keys show it's on)
- Caps Lock (⇪) — pulses while Caps Lock is on
The two icon keys along the bottom row match the symbols printed on those keycaps:
- ⌫ Backspace (bottom-left) — deletes the character to the left
- ⏎ Enter (bottom-right) — return / new line
Lighting Control
Turn the status display on first (tap the logo key), then the two bottom rows adjust the backlighting. Each control has a + on the upper row and a − directly below it, matching the labels in the layout above:
- RGB on/off — turn the backlighting on or off (bottom-left key)
- Hue + / − — change the color, moving around the color wheel
- Sat + / − — saturation: + makes the color deeper, − fades it toward white
- Bright + / − — brighter / dimmer lights
- Speed + / − — faster / slower animation
- Effect ▶ / ◀ — step through the animation effects (forward / back)
Making Changes to the Layout
Use ZMK Studio
- Plug in your Speller Keyboard with USB
- Navigate to studio.cyboard.digital on the host device (Chrome or Edge).
- When prompted to unlock the keyboard: press the logo key (the status lights come on), then press the A key, then press the logo key again.
- Make changes, which are instantly applied.
Change the Keycaps
- Unscrew the 4 screws on the back of the keyboard
- Pull the top half of the case off.
- Pull the keycaps off that you want to rearrange/replace, and press the new ones into place.
Update Your Speller's Firmware
Updating takes about two minutes on a computer — any Windows, Mac, or Linux computer will do. If you have a newer iPad with a USB-C port, you can do it straight from the iPad instead, with no computer involved. Either way you'll need a USB-C data cable (the one that came with your Speller works).
Prefer to watch? This video walks through the whole update on a computer — or read on below for the written steps.
Please use a computer for this one. An iPad with a Lightning connector can't connect to the keyboard this way with an ordinary cable, so the update won't start — the keyboard will simply never appear on the iPad. Any computer works and it only takes about two minutes. If getting to a computer is a problem, email us at support@cyboard.digital and we'll figure something out.
An older version of ChromeOS may not open the keyboard's update drive, so the
ASSIMILATOR drive doesn't appear — or ChromeOS reports the device as
unsupported. Recent ChromeOS versions fix this, so start by updating:
- Update ChromeOS (Settings → About ChromeOS → Check for updates) and try again. This resolves it on most Chromebooks (Intel/AMD).
- If the drive still doesn't appear — most likely on an ARM-based Chromebook — do this one-time update on any Windows, Mac, or Linux computer, or on a USB-C iPad instead.
Your Speller keeps working normally in the meantime; you just won't have the newer pairing until it's updated. No other computer to borrow? Email support@cyboard.digital and we'll figure something out.
Step 1 — Download the latest firmware on the device you'll plug the keyboard into:
- On a computer
- On an iPad
Step 2 — Plug the Speller into your computer with the USB cable.
Step 3 — Double-tap the reset button next to the USB port with
something thin, like a pen tip or paperclip (two quick presses, like a
double-click). The power switch lights up and pulses blue (it may also
show red if the battery is charging), and a drive called ASSIMILATOR
appears on your computer — like plugging in a USB stick.
Step 4 — Copy the downloaded firmware file onto the ASSIMILATOR
drive (drag it from your Downloads folder onto the drive). The drive
disappears by itself when the copy finishes. If your computer shows an
error message at this point, don't worry — that's normal, and the update
almost certainly still worked.
Step 5 — The keyboard restarts itself with the new firmware. Once the power switch stops glowing blue, you're done and it's safe to unplug.
You can update straight from an iPad with a USB-C port — no computer needed.
Step 2 — In Safari, tap the download button above, then tap Download. (You can find the file later in the Files app, in the Downloads folder.)
Step 3 — Plug the Speller into the iPad's USB-C port with the USB cable.
Step 4 — Double-tap the reset button next to the USB port with something thin, like a pen tip or paperclip (two quick presses, like a double-click). The power switch lights up and pulses blue.
Step 5 — Open the Files app. Under Locations in the sidebar,
a drive called ASSIMILATOR appears. In the Downloads folder,
touch and hold the firmware file, choose Copy, then open
ASSIMILATOR, touch and hold in the empty space, and choose
Paste.
Step 6 — The keyboard restarts itself with the new firmware. Once the power switch stops glowing blue, you're done and it's safe to unplug.
After updating from v1.1.0 or earlier, pair again once: Forget This Device for Speller in your device's Bluetooth settings, hold the Bluetooth key for 3 seconds, and pair fresh — the new pairing system starts clean.
What's new in each version
v1.2.1 — July 2026
Bluetooth housekeeping. The keyboard now only shows up in a device's Bluetooth list when it will actually connect: it stays hidden when it has no pairing stored, and a keyboard you've Forgotten on a device no longer lingers in that device's list — while a device you're still paired with reconnects as before. Nothing about pairing changes.
v1.2.0 — July 2026
Pairing, radically simplified:
- One pairing key, one gesture — hold the Bluetooth key for 3 seconds and pair from your device. The same two steps every time, on every device; no more profile slots to juggle, and no more PIN codes.
- Tap to switch between cable and Bluetooth — when plugged in, a quick tap of the Bluetooth key moves your typing between USB and Bluetooth.
- Clearer status lights — blue means Bluetooth, white means USB (on the two keys right beside the port); the bright one is where your typing goes. Press the logo to see everything, including battery, at a glance.
- Caps Lock light fixed — the Caps Lock key now pulses whenever Caps Lock is on.
v1.1.0
- Keyboard status display and settings moved to the BT key.
- Status lights for Bluetooth profiles (A–E), USB (F), and battery (K–N).
Troubleshooting
Keyboard Only Sending Numbers
If your Speller Keyboard is only sending numbers, it is probably stuck in the factory testing mode. To exit this mode, you must unplug and turn off the keyboard, then turn it back on.
Can't connect, or connected but not typing
This almost always means the device has an old Speller entry from an earlier pairing — most often because you're switching back to a device you'd paired before. The fix is one clean re-pair, and it works on every device, every time:
- On the device, open Bluetooth settings and Forget / Remove any existing Speller entry.
- On the keyboard, hold the Bluetooth key for 3 seconds — it forgets its old pairing and pulses blue, ready to start fresh.
- Pair with the fresh Speller listing that appears in the device's Bluetooth settings.
If the fresh listing is slow to appear on an iPad, switch the iPad's Bluetooth off and back on — the list refreshes right away.
Windows, if it still misbehaves: restart the PC, and in Device Manager → View → Show hidden devices → Bluetooth, uninstall any leftover Speller entries, then re-pair as above.
Pairing with older firmware (v1.1.0 and earlier)
Pairing instructions for Spellers that haven't been updated yet
Older firmware manages Bluetooth with five manual "profiles" (slots), one per device:
- Power On: Slide the switch at the top toward the USB port until it clicks.
- Pair First Device (Profile 0):
- Profile 0 is selected by default on a new keyboard. Once powered on, it automatically broadcasts for pairing.
- On your device, open Bluetooth Settings, find Speller, and tap Connect.
- If prompted for a PIN: press #, type the code using the A–J keys (they type 1–0), press Enter, then press # again.
- Pair Additional Devices (Profiles 1–4):
- Press the BT key to enter the keyboard settings layer.
- Keys A, B, C, D, and E select profiles 0–4.
- If the selected profile already has a pairing, press the Cyboard logo key once to clear it.
- Exit the settings layer by pressing BT again. The keyboard will broadcast on the selected profile.
- In your device's Bluetooth Settings, select Speller.
- Switching between devices: press BT, tap A–E to choose the profile, then press BT again. Only the active profile receives keystrokes.
- Clearing one pairing: press BT, select the profile (A–E), press the Cyboard logo key once, then press BT to exit. Also choose Forget This Device on the device itself.
We recommend updating to the latest firmware — pairing becomes a single button, and these steps disappear.
Questions? Email us at support@cyboard.digital — we're happy to help.